click the 'Documents' header to see previous entries
https://rainbowstampsandcoins.blogspot.com/search/label/documents
5.2 Working with columns
5.2.1 Structure
To split a page in two columns, we need a command with a ‘START’ and an ‘END’. Just like we did when we made paragraphs.
· PAGE_COLUMN_START ( [distance to the middle of the page] )
· PAGE_COLUMN_NEXT
· PAGE_COLUMN_STOP
The first command starts the left column, the
second command jumps tot he right column, and the last command closes the two
columns.
Technically speaking the last command isn’t needed, as this command
automatically stops at the end of a page. You will need the ‘STOP’ command if
you plan text or boxes over the full widht of the page, after you worked in two
columns.
This command creates so to say,
two smaller pages on the main page. Which means you can create paragraphs in
both columns separately if you want.
Before we start adding text, we take a look at the
structure of the commands:
PAGE_COLUMN_START ( [distance to the
middle of the page])
PAGE_TEXT_PARAGRAPH_START(HB 10 CENTRE)
PAGE_TEXT_PARAGRAPH_END
PAGE_COLUMN_NEXT
PAGE_TEXT_PARAGRAPH_START(HB 10 CENTRE)
PAGE_TEXT_PARAGRAPH_END
PAGE_COLUMN_STOP
Reopen Test Design 9, save as Test Design 10 and
erase all that comes after ‘PAGE_START’.
Change the album settings : make the default font : (DJ “DejaVu Sans”)
ALBUM_DEFINE_FONT (DJ "DejaVu Sans")
Underneath the PAGE_START-command, you can add a comment line, as well as a
title, in the new font:
Don't forget the [distance to the middle of the page]
: make it (2.0)
So far it should look like this :
PAGE_START
#
------------------------------------------------------------------------------
# ------------------------------------------------------------------------------
PAGE_TEXT_CENTRE (DJ 14 "\nUsing columns in texts")
PAGE_RULE_H (0.1 0 8)PAGE_COLUMN_START (2.0)
PAGE_TEXT_PARAGRAPH_START(HB 10 CENTRE)
PAGE_TEXT_PARAGRAPH_END
PAGE_COLUMN_NEXT
PAGE_TEXT_PARAGRAPH_END
PAGE_COLUMN_STOP
Now we need to add the text below 3 times in each column, (between paragraph_start and paragraph_end):
Lorem ipsum dolor sit amet, consectetur adipiscing elit, sed do eiusmod tempor incididunt ut labore et dolore magna aliqua. Ut enim ad minim veniam, quis nostrud exercitation ullamco laboris nisi ut aliquip ex ea commodo consequat. Duis aute irure dolor in reprehenderit in voluptate velit esse cillum dolore eu fugiat nulla pariatur excepteur sint occaecat cupidatat non proident, sunt in culpa qui officia deserunt mollit anim id est laborum.\n
5.2.2 Fine tuning
We could already generate the PDF and have a look now, but we can make it a bit more exciting, by fine tuning the columns :
Since we work in two small pages (Left and right column), we can work on both pages/sides in different ways.
Add following
command after “Page_Column_Start”:
COLOUR_PAGE_TEXT (red)
Now do the same after “Page_Column_Next” :
COLOUR_PAGE_TEXT (green)
and finally once more, after “Page_Column_Stop”
COLOUR_PAGE_TEXT (black)
this last command is to put the text back to black
Finally we change one parameter in each column :
In column 1 (left) :
PAGE_TEXT_PARAGRAPH_START(DJ 10 Centre)
In column 2 (right): PAGE_TEXT_PARAGRAPH_START(DJ 10 Justified)
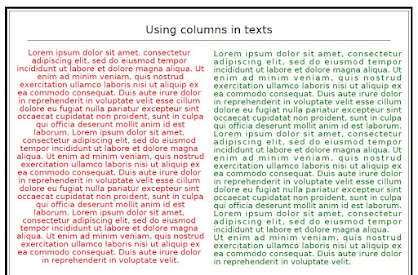
Click now Generate and PDF :
Now we see in the first column, the word “UT” in a lonely positioin. This can be solved by adding an \n command before that word.Once done, you can change the colour of the first column to (blue) and the second column to (gold).
Make sure the PDF is closed before generating it again.
to be continued...
previous part : https://rainbowstampsandcoins.blogspot.com/2021/05/making-your-own-album-21.html
next part : https://rainbowstampsandcoins.blogspot.com/2021/05/making-your-own-album-23.html


No comments:
Post a Comment