click the 'Documents' header to see previous entries
https://rainbowstampsandcoins.blogspot.com/search/label/documents
5 Module 3 – A page layout
5.1 Cascade-system
Like a waterfall, we start on the top level, giving our
album a basic layout. All what is determinated in the album settings, will be
repeated in the album pages later on. We have already seen how to put album
frames, default fonts, letter spacing and so on.
Between the top level (album) and the bottom level (actual pages), we can add a
level to make a fixed or dynamic layout for chapters.
At first we will see how to created fixed layouts for chapters, that can be repeated as long as we need them for a specific part of the album. In a later lesson, I will show how we can make those ‘chapter settings’ dynamic.
On each page, we can create a certain subtitle , with a
certain image.
This can be a flag – if you work country wise, but also a emission, print
plate, era …
5.1.1 Static and dynamic layouts
In module 4 A we will see how to make the chapters dynamic but to start, we keep it simple, with static layouts.
Think about how you see your album.
If you only need a title page at the beginning of your album, this topic might
be less interesting, but take some time to see the possibilities and opportunities:
Even if you collect country-wise…
* A country can have different flags, different rulers during its existence
* German States, have small chapters (states) with only few pages each
* Your country album might start with some historic pages, geographical pages, …
* A theme collection can be devided in subtopics
Music : singers, instruments, composers, …
* Part of the album is before independence, the other part after
* similar with pre-decimal and decimal issues
* Following a specific listing, might need you to have chapters for official
issues, railway issues, tax issues, ….
And so on…
5.1.2 Adding logos or images on each page.
Open the
design COMMAND GROUP, which is included in AlbumEasy 4.2.1.
You can find it by clicking the grey arrow, or the ‘open’ menu.

We see a lot of codes that we already have seen in the previous chapters.

These
are the album-settings, they are valid for the entire album.
Notice the use of a new font : “Copperplate Gothic”.
This is not a default font for AlbumEasy, but it is available on most
computers.
As it is not default, we need to make it the default font for this album.
Using : ALBUM_DEFINE_FONT to add it.
Behind the command, we give the shortended code and the exact name of the font
on your computer.
The default fonts (Helvetica, TimesNewRoman, …) have been given 2-letter codes
:
HN/ HB / TN / TB, …
A non-default, but generally available font, can be given a 3-letter code.
Notice : 2 letters will do the trick too, but its easier to make a
difference, as later we will be able to add more fonts, and 2 letter codes
might be too limited.
We have given the font “Copperplate-Gothic” the code : CPG, and from there on, we can use CPG to work with this font.
After the album settings, we see lines 30 to 32 giving comment on the new command we will learn about, the “COMMAND GROUP”.
Save the document as Test Design 9, and if you wish, you can change the settings to A4, or make the comment like we did before.
ALBUM_PAGES_SIZE (210.0 297.0)
ALBUM_PAGES_MARGINS (15.0 15.0 15.0 15.0) # W, E, N, S
ALBUM_PAGES_BORDER (0.8 0.1 0.0 1.0) # double frame line
ALBUM_PAGES_SPACING (3.0 3.0)
ALBUM_DEFINE_FONT (CPG "Copperplate-Gothic")
5.1.3 Page_Start_Group
For this topic, we need to look where the new code begins : PAGE_START_GROUP
This particular command, has a beginning (_BEGIN) and an end (_END), just like we saw in 4.2.2 Page_Text_Paragraph.
 |
| Page_Start_Group - command |
5.1.4 Parameters within the command group
The first and last command in this ‘group’ does not need any parameters.
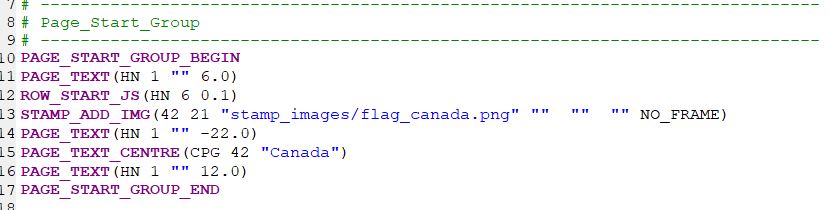
PAGE_START_GROUP_BEGIN
PAGE_START_GROUP_END
Between ‘BEGIN’ and ‘END’, we will have to write what we will see in this (each) chapter.
PAGE_TEXT(HN 1 "" 6.0)
This line makes an empty text line between the frame and the image below.
There are 4 pm’s : font and size, the (empty) text between double straight quotes, the 6 indicates 6 mm towards the next item.(the image)ROW_START_JS(HN 6 0.1)
Mandatory code to add images (3 pm’s, font, size and spacing)STAMP_ADD_IMG(42 21 "stamp_images/flag_canada.png" "" "" "" NO_FRAME)
7 pm’s regarding the inserted image :Height and width in mm
Location of the image on your computer “folder/image + extention”
Subtext left, middle and right (texts between “double straight quotes”
FRAME of NO_FRAME, to have or not to have a frame around the image
PAGE_TEXT(HN 1 "" -22.0)
4 pm’s, font and size / “no text”/ negative spacing, to make the tekst appear next and not under the imagePAGE_TEXT_CENTRE(CPG 42 "Canada")
Inserting text next to the image (thanks to the negative number in the previous command)
3 pm’s, font and size + “text”PAGE_TEXT(HN 1 "" 6.0)
This line leaves an empty line of 6 mm to the next part of the page, and not right underneath the previouis line.
There are 4 pm’s: font + size / “no text”/ and distance to next line.
5.1.5 Creating pages with a fixed layout
Now to
create something useful on the screen – and on paper, we need to add actual ‘pages’
to our album.
This will be a lot easier, now that we have created a fixed layout to our
pages.
We only need to focus on the actual layout of the individual pages. (boxes)
Pages
are made with the PAGE_START-*command
We add a text line for the exercise, and do this twice (two pages).
If you like to add a comment line to the program, it will help to make a visualisation
in your programming.
Add this to your Test Design 9 :
# ------------------------------------------------------------------------------
# Album Page 1# ------------------------------------------------------------------------------
PAGE_START
PAGE_TEXT_CENTRE (HN 14 "Page One of the album")#
------------------------------------------------------------------------------
# Album Page 2
PAGE_START
PAGE_TEXT_CENTRE (HN 14 "Page Two of the album")Click Generate, and PDF – if all is correct, you can close the PDF again.

More options in Module 4 A, but it is useful to check Module 3 B first.
to be continued...
previous part : https://rainbowstampsandcoins.blogspot.com/2021/04/making-your-own-album-20.html
next part : https://rainbowstampsandcoins.blogspot.com/2021/05/making-your-own-album-22.html
No comments:
Post a Comment